This part of the documentation describes the Form Designer, a GUI builder meant to help you interactively design dialogue forms for use with the Forms Library. This part assumes the reader is familiar with the Forms Library and has read Part I of this document.
Even though designing forms is quite easy and requires only a relatively small number of lines of C-code, it can be time consuming to figure out all required positions and sizes of the objects. The Form Designer was written to facilitate the construction of forms. With Form Designer, there is no longer any need to calculate or guess where the objects should be. The highly interactive and WYSIWYG (what you see is what you get) nature of the Form Designer relieves the application programmer from the time consuming process of user interface construction so that he/she can concentrate more on what the application program intends to accomplish.
Form Designer provides the abilities to interactively place, move and scale
objects on a form, also the abilities to set all attributes of
an object. Once satisfactory forms are constructed, the Form Designer generates
a piece of C-code that can then be included in the application
program. This piece of code will contain one procedure
create_form_xxx() for each form, where xxx indicates
the form name. The application
only needs to call it to generate the form designed.
The code produced is easily readable.
The Form Designer also lets the user identify each object with C variables for later reference in the application program and allows advanced object callback bindings all within the Form Designer. All actions are performed with the mouse or the function keys. It uses a large number of forms itself to let the user make choices, set attributes, etc. Most of these forms were designed using the Form Designer itself.
It is important to note that the Form Designer only helps you in designing the layout of your forms. It does not allow you to specify the actions that have to be taken when, e.g., a button is pushed. You can indicate the callback routine to call but the application program has to supply this callback routine. Also, the current version is mostly a layout tool and not a programming environment, not yet anyway. This means that the Form Designer does not allow you to initialize all your objects. You can, however, initialize some objects, e.g., you can set the bounds of a slider inside the Form Designer. Eventually full support of object initialization will be implemented.
To start up the Form Designer simply type fdesign without any argument.
(If nothing happens, check whether the package has been installed
correctly.) A black window (the main window) will appear on the screen. This is
the window in which you can create your forms.
Next the control panel appears on the screen. No form is shown yet.
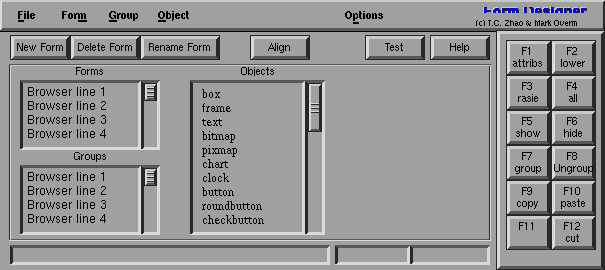
Figure 8.1: Form Designer control panel
The control panel consists of five parts (see Fig. 8.1). The first part is the menu bar consisting of several groups of menus from which you can make selections or give commands to the program. At the left there is a list of forms you are working on. The list is empty, indicating that there are no forms yet. You can work on up to 64 forms at the same moment. You can use this list to switch from form to form. To the bottom of that there is a list of all groups in the form you are working on. It will be empty because there are no groups. Ignore this at the moment as we will come back to groups and their use later. Next to this you find a list of all different types of objects that can be placed on the forms. You can use the mouse to select the type of object you want to add to the form. At the right you find a number of buttons to give commands to the program. Each of these buttons is bound to a function key. You can either press the buttons with the mouse or press the function keys on the keyboard. This will have the same effect. The functions of these keys will be described below.
To create a new form click with the mouse on the button labeled New Form on the top-left corner of the control panel just below the menu bar. A little notifier will appear prompting you for the name of the form. This is the name under which the application program will know the form. You will have to provide a name (which must be a legal C or C++ variable name). Type in the name and press <RETURN>. Now the background of the form appears in the main window. Note the form name is added in the list of forms in the control panel.
To add an object to the form, choose the type of object in the control panel by clicking in the list of object classes. Next move the mouse into the form you are creating and drag the mouse while pressing the left mouse button. Keep the mouse button pressed and create a box that has the desired size. Release the button and the object will appear. Note that a red outline appears around the new object. This means that the object is selected. In this way you can put all kinds of objects on the form.
It is possible to move objects around or change their size. To this end, first select the object by pressing the mouse in it. A red outline will appear around the object. Now, dragging a mouse button will move the object. By grabbing the object at one of the four red corners you can scale it. In this way you can change the layout of the objects on the form. It is also possible to select multiple objects and move or scale them simultaneously. See below for details.
To change the attributes, e.g., the label, of an object, click the mouse inside the object to select it. Next, press the function key <F1> (either on the keyboard or in the control form) or click on the Attrib in the control panel. This can also be achieved by double-clicking the right mouse button. A form will appear in which you can indicate all the different attributes. Their meanings should be clear (if you have read the documentation on the Forms Library). Change the attributes by pressing a mouse button on them. A menu will appear in which you can make the required choice. Change the attributes you want to change and press the button labeled Accept. Press Restore to restore the original attributes. See below for more information about changing attributes.
In this way you can create the forms you want to have. Note that you can work
on different forms at the same moment. Just add another form in the way
described above and use the list of forms to switch between them.
After you have created all your forms choose Save from the
File menu to save them to disk.
It will ask you for a file name using the file selector. In this
file selector you can walk through the directory tree to locate
the place where you want to save the file. Next, you can type in
the name of the file (or point to it when you want to overwrite an
existing file). The name should end with .fd. So for example,
choose ttt.fd. The program now creates three files:
ttt.c, ttt.h and ttt.fd. ttt.c contains
a readable piece of C code that creates the forms you designed. The
file ttt.h contains the corresponding header file for inclusion
in your application program.
The file ttt.fd contains a description of the
forms in such a way that the Form Designer can read it back in later.
The application program now simply has to call the routine
create_form_xxx() to create the different forms you designed.
These are the basic ideas behind the Form Designer. Below we describe the program in detail.
To start the Form Designer simply type
fdesign [-xformoptions] [-fdesignoptions] [files[.fd]]
An initial window will be created and mapped. Depending on the window manager, you may have the option to interactively select where to place the window if -geometry option is missing. Next the program places the control panel on the screen. You can move this panel, if required, to the place you want (you can also change the default placement of the control panel via resources).
fdesign accepts all of the XForms command line options as well
as the following
fdesign does its work interactively. This option causes
the fdesign simply read a list of fdesign output
file (the .fd files) and emit the corresponding C-routines and
header files.
fdesign -convert.
forms.h to
header. Useful on systems where forms.h is
renamed to something else or you need application
specific constants/defines for the UI to function. In
the later case, header may simply contain
#include "forms.h"
#define mystuff 1
Note that -help, -version and -convert do not require a connection to an X server.
If an output unit other than the default (pixel) is selected, all object sizes in the output file will be in the unit requested. This kind of UI has a fixed and device resolution independent size (in theory at least) and can be useful for drawing applications.
fdesign recognizes the following resources
| workingArea.geometry | Geometry | string |
| control.border | XForm.Border | bool |
| control.geometry | Control.Geometry | string (position only) |
| attributes.geometry | Attributes.Geometry | string (position only) |
| attributes.background | Attributes.Background | string (e.g.,gray80) |
| align.geometry | Align.Geometry | string (position only) |
| help.geometry | Help.Geometry | string (position only) |
| convert | Convert | bool |
| unit | Unit | string |
| altformat | AltFormat | bool |
| xformHeader | XFormHeader | string |
| helpFontSize | HelpFontSize | int |
| main | Main | bool |
Note that resource specification of convert requires an X connection.
In addition, all XForms's resources specification can be used to influence the appearance of various panels. The most useful ones are the font sizes
| *XForm.FontSize | all label font sizes |
| *XForm.PupFontSize | all pup font sizes |
To create a new form press the button labeled New Form, indicate the enclosing box of the form and type in a (unique) name for the form. The form is shown in the main window and objects can be added to it.
There are two ways to change the size of a form at a later stage. The easiest way is to simply change the size of the main window and the form will resize itself to fit the new size. Or you can select the bottom box of the form, using the right mouse button. Next grab the box using the middle mouse at the lower-right corner and scale it. Note that objects lying outside the form will be invisible when the form is shown by the application program.
To change the name of the current visible form, press the button labeled Rename Form under the list of forms. You will be prompted for the new form name.
To delete a form, press the button labeled Delete Form. The current form will be removed.
To add an object, choose the class of the object from the object list in the middle of the control panel. Next drag the left mouse button on the form and an outline showing the current size of the object will appear. When the size is correct release the mouse button.
Note that the position and size of the object is rounded to multiples of 10 pixels. This can be changed. See below on alignments.
To perform operations on objects that are already visible in the form, we first have to select them. Any mouse button can be used for selecting objects. Simply click it inside the object you want to select. A red outline will appear, indicating that the object is selected. In some cases when the currently selected object is large and encloses some smaller objects in it, left mouse might not be able to select the enclosed small objects. In this, use the the right mouse. Another way of selecting objects is to use the <TAB> key or the <F11> or the button labeled F11, which walks down the object list and selects an object upon each press.
It is also possible to select multiple objects. To this end, draw a box by dragging the mouse around all the objects you want to select. All objects that lie fully inside the box will be selected. Each selected object will get a red outline and a red bounding box is drawn around all of them.
To add objects to an already existing selection, hold down the <SHIFT> key and press the right mouse button inside the objects. You can remove objects from the selection by doing the same on an already selected object.
It is possible to select all objects (except for the backface) at once using the function key <F4>.
One note on the backface of the form. Although this is a normal object, it can not be treated in the same way as the other objects. It can be selected, but never in combination with other objects. Only two operations are allowed on it: changing its attributes and scaling it (which scales the size of the form).
Moving and scaling of objects is done using the middle mouse button. To move an object or a collection of objects to a new place, first select it (them) using the right mouse button as described above. Next press the middle mouse button inside the bounding box (not near one of the corners) and move the box to its new position.
To scale the object or objects, pick up the bounding box near one of its corners (inside the red squares) and scale it.
When holding the <SHIFT> key while moving an object or group of objects, first a copy of the object(s) is made and the copy is moved. This allows for a very fast way of duplicating (cloning) objects on the form: First put one on the form, change the attributes as required and next copy it.
For precise object movement, the cursor keys can be used. Each
pressing of the four directional cursors moves the object 5 pixels.
To change the step size, precedes the cursor keys with 0-9 with
0 indicating 10 pixels. If <SHIFT> is down,
instead of moving the object, the object size is increased or
decreased by the step size.
Sometimes you have a number of objects and you want to align them in some way, e.g. centered or all starting at the same left position, etc. To this end press the button labeled Align. A special form will appear in the top right corner. You can leave this form visible as long as you want. You can hide it using the button Dismiss on the form or by clicking button Align again.
Now select the objects you want to align. Next, press one of the alignment buttons in the form. The buttons mean top row: flush left, horizontal center, flush right, horizontal equal distance (see below), bottom row: align bottoms, vertical center, align tops, vertical equal distance. Note that alignments are relative to the selection box, not to the form. Equal distance alignment means that between all the objects an equal sized gap is placed. The objects are kept in the same left to right or bottom to top order.
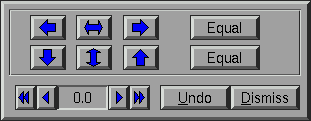
Figure 10.1: Object alignment control
In the alignment form you can also indicate the snapping size using the counter at the bottom. Choose 0 if you don't want to snap positions. Default snapping is 10 pixels. Snapping helps in making objects the same size and in making them nicely aligned.
The Undo undoes the last alignment change. It is an undo with a depth of 1, i.e., you can only undo the last change and an undo after an undo will undo itself. Note however, Any modification to the selected objects invalidates the undo buffer.
The objects in a form are drawn in the order in which they are added. Sometimes this is undesirable. For example, you might decide at a later stage to put a box around some buttons. Because you add this box later, it will be drawn over the buttons thus making the buttons invisible (if you put a framebox over a button, the button will be visible but appears to be inactive!). This is definitely not what you want. The Form Designer makes it possible to raise objects (bring them to the top) or lower them (put them at the bottom). So you can lower the box to move it under the buttons. Raising or lowering objects is very simple. First select the objects using the right mouse button and next press the function key <F2> to lower the selection or <F3> to raise it.
Another use of raising and lowering is to change the input field visitation order (via <TAB> key). Input fields focus order is the same as the order in which they are added to the form. This can become a problem if another input field is needed after the form is designed
because this extra input field will always be the last among all input field on the form. Raising the objects becomes handy to solve this problem. What really happens when a object is raised is that the raised object becomes the last object added to the form. This means you can re-arrange the focus order by raising all input fields one by one in the exact order you want the focus order to be, and they will be added to the form in the order you raise them, thus the input focus order.
To set attributes like type, color, label, etc., of an object first select it (using the right mouse button) and next press the function key <F1> (or click on the button labeled F1). If only one object is selected you can change all its attributes, including its label, name, etc. It is also possible to change the attributes of multiple objects as long as they all are of the same class. In this case you cannot change the label, name, etc. because you probably want them to remain different for the objects.
A form will appear in which you can indicate the different settings. Before we continue, the organization of the Attribute form and classification of attributes need a little explanation. Attributes of an object are divided into two categories. The Generic attributes are shared by all objects. These include type, color, label, callback functions etc. The Specific attributes are those that are specific to a particular object class, such as slider bounds, precision etc. When the Attribute form is first shown, only the Generic attributes are shown. Press on folder Spec to activate the object class specific attributes part (and press on button Generic to switch back to the generic attributes part).
Here you can indicate type, boxtype, and colors of the object, and style, size, alignment and color of the label. The type, boxtype, style, size and alignment are set using a choice object. To change it either use the left or middle mouse button to cycle through the possibilities, or use the right mouse button to get a menu with all choices. To change one of the colors, push the mouse on it. A box will appear showing the available colors in the internal color map. You can indicate the color you want with the mouse or use cancel to keep the color unchanged. (The color of the cancel button is the current color you are changing.) You can use the arrows to run through the color map to find other colors.
Once you are satisfied with the settings, press the button labeled Ready and the form will disappear. If you don't want to change the attributes after all press the button labeled Cancel.
Three more fields can be filled in in the attributes form: name, callback
and argument. Name indicates the name of the object. If you type in a name here
the object will be known to the application program under this name so that
the program can refer to it. Take care that all object names used are
different. They should be legal C variable names.![]() It is possible to use
arrays of objects. E.g. if you define some objects as
It is possible to use
arrays of objects. E.g. if you define some objects as
obj[0], obj[1] and obj[2] the piece of C-code
produced by the Form Designer will contain a declaration of an array
tt of size 3. (Only one-dimensional arrays are treated correctly.)
Callback indicates the callback routine.
If you type in something here, this routine will be bound to the object. In
this case you also have to provide an argument that must be an integer
(or cast to integer, as in (long)&variable).
Of course, the application program will have to provide the callback
routine.
Note that when copying objects these fields are also copied. This might lead to multiple objects with the same name. This will lead to undesired effects. So watch out for these after copying an object.
Currently not all objects can be initialized from with the Form Designer.
Depending on the objects, different attributes are shown that are considered to be intrinsic to the objects, such as slider bounds, precision etc. All the attributes should be self-explanatory and all changes made are shown immediately so you can see what effects the changes have on the object. Once satisfactory results are achieved, press button Accept to accept the settings (press on the folder Generic has the same effect). Two additional buttons Cancel and Restore are available to cancel the changes (and quit the attributes setting form) and restore the defaults, respectively.
One particular aspect of the pixmap/bitmap button initialization needs a
little more explanation as the setting of button Use
data has no effect on the appearance of the button but
nonetheless affects the generated code. By default, button Use data is false, indicating the pixmap/bitmap
file specified is to be loaded dynamically at run time via
fl_set_pixmapbutton_file() (or the bitmap counterpart). If
Use data is true, the specified file and
its associated data will be #include'd at compile time so the
data is part of the code. Depending on the application setup, you may choose
one method over the other. In general, including the data in the code will
make the code slightly larger, but it avoids the problems with not finding
the specified file at runtime. The button Full
Path only applies if Use Data
is true. If Full Path is true, the pixmap
file will be #included using the full path otherwise only the
filename is used, presumably the compile process will take care of the path
via -I flag in some system dependent way. In general, not using
the full path is more flexible.
You can remove objects from the form by first selecting them and next pressing function key <F12> or double-clicking the left mouse button. The objects will disappear but are in fact saved in a buffer. You can put them back in the form, or in another form, by pasting them using <F10>. Note that only the last collection of deleted objects is saved in the buffer.
It is also possible to put a copy of the selection in the buffer using <F9>. This selection can now be put into the same form or into a different form. This allows for a simple mechanism of making multiple copies of a set of objects and for moving information from one form to another.
To clone the currently selected object, hold down the <SHIFT> key and drag the selected object. The cloned object will have exactly the same attributes as the original object except for object name and shortcut keys. Should these be cloned, the generated code would not be compilable (or cause runtime misbehavior).
As described in the tutorial about the Forms Library, sets of radio buttons must be placed inside groups. Groups are also useful for other purposes. E.g. you can hide a group inside an application program with one command. Hence, the Form Designer has some mechanism to deal with groups.
In the control panel there is a list of groups in the current form. As long as you don't have groups, this list will be empty. To create a group, select the objects that should come in the group and press the function key <F7>. You will be prompted for the name of the group. This should be a legal C variable name (under which the group will be known to the application program) or should be empty. This name will be added to the list. In this way you can create many groups. Note that each object can be in only one group. So if you select it again and put it in a new group, it will be removed from its old group. Groups that become empty this way automatically disappear from the list. (When putting objects in a group they will be raised. This is unavoidable due to the structure of groups.)
In the list of groups it is always indicated which groups are part of the current selection. (Only the groups that are fully contained in the selection are indicated, not those that are only partially contained in it.) It is also possible to add or delete groups in the current selection by pushing the mouse on their name in the list.
Note that there is no mechanism to add an object to a group directly. This can, however, be achieved using the following procedure. Select the group and the new object and press <F7> to group them. The old group will be discarded and a new group will be created. You only have to type in the group name again.
Sometimes you want to un-group the objects in an existing group, i.e., get them out of the group they are currently in. To this end simply select the group and press <F8>. (This only works if one group is selected.)
You can use the item Rename group under the Group menu to change the name of a selected group. If multiple groups are selected only the name of the first group is changed.
Sometimes it is useful to temporarily hide some objects in your form. In particular when you have sets of overlapping objects. To this end, select the objects you want to hide and press <F6>. The objects (though still selected) are now invisible. To show them again press <F5>. A problem might occur here. When you press <F5> only the selected objects will be shown again. But once an object is invisible it can no longer be selected. Fortunately, you can always use <F4> to select all objects, including the invisible ones, and press <F5> after that. It is better, though, to first group the objects before hiding them. Now you can select them by pressing the mouse on the group name in the group browser.
To test the current form, press the button labeled Test. The form will be displayed in the center of the screen. A panel will appear at the top right corner of the screen. This panel will show you the objects that will be returned and the callback routines called when working with the form. In this way you can verify whether the form behaves correctly and whether all objects have either callback routines or names (or both) associated with them. You can also resize the form (if the backface of the form allows resizing) to test the gravities. You can play with the form as long as you want. When ready, press the button Stop Testing.
Note that any changes you made, including the size of the form, to the form while testing do not show up when saving the form. E.g. filling in an input field or setting a slider does not mean that in the saved code the input field will be filled in or the slider set.
To save the set of forms created select the item Save
or Save As from the File menu. You will be prompted
for a file name using the file selector if the latter
is selected. Choose a name that ends with .fd.
e.g. ttt.fd.
The program will now generate three files ttt.c,
ttt.h and ttt.fd. If these files already
exist, backup copies of these are made (by
appending .bak to the file names).
ttt.c contains a piece of C-code that builds up the
forms and ttt.h contains all the object and form
names as indicated by the user. It also contains declaration
of the defined callback routines.
Depending on the options selected from the Options
menu, two more files may be emitted. Namely the
main program and callback function templates. They are
named ttt_cb.c and ttt_main.c respectively.
There are two different kind of formats for the C-code
generated. The default format allows more than one instances
of the form created and uses no global variables. The other
format, activated by altformat on the command line,
or from the Options menu by selecting Alt Format,
uses global variables and does not allow more than one
instantiation of the designed forms. However, this format
has a global routine that creates all the forms defined,
which by default is named create_the_forms() but it
can be changed (see below).
Depending on which format is output, the application program typically only needs to include the header file and call the form creation routine.
To illustrate the differences between the two output formats
and the typical way an application program is setup, we look at
the following hypothetical situation: We have two forms,
foo and bar, each of which contains several objects,
say fnobj1, fnobj2 etc. where n=1,2. The default output
format will generate the following header file (foobar.h):
   #ifndef FD_foobar_h_
   #define FD_foobar_h_

   /* call back routines if any */
   extern void callback(FL_OBJECT *,long);

   typedef struct
   {
        FL_FORM *foo;
        void *vdata;
        char *cdata;
        long  ldata;
        FL_OBJECT *f1obj1;
        FL_OBJECT *f1obj2;
   } FD_foo;

   typedef struct
   {
        FL_FORM *bar;
        void *vdata;
        cahr *cdata;
        long  ldata;
        FL_OBJECT *f2obj1;
        FL_OBJECT *f2obj2;
   } FD_bar;

   extern FD_foo *create_form_foo(void);
   extern FD_bar *create_form_bar(void);

   #endif /* FD_foobar_h */
and the corresponding C file:
   #include "forms.h"
   #include "foobar.h"

   FD_foo *create_form_foo(void)
   {
       FD_foo *fdui = (FD_foo *) fl_calloc(1, sizeof(FD_foo));

       fdui->foo = fl_bgn_form(....);
       fdui->f1obj1 = fl_add_xxxx(....);
       .....
       fl_end_form();

       fdui->foo->fdui = fdui;
       return fdui;
   }

   FD_bar *create_form_foo(void)
   {
       FD_bar *fdui = (FD_bar *) fl_calloc(1, sizeof(FD_bar));

       fdui->bar = fl_bgn_form(....);
       fdui->f2obj1 = fl_add_xxxx(....);
       .....
       fl_end_form();

       fdui->bar->fdui = fdui;
       return fdui;
   }
The application program would look something like the following:
   #include "forms.h"
   #include "foobar.h"

   /* add call back routines here */

   main(int argc, char *argv[])
   {
       FD_foo *fd_foo;
       FD_bar *fd_bar;

       fl_initialize(...);
       fd_foo = create_form_foo();
       init_fd_foo(fd_foo);        /* application UI init routine */

       fd_bar = create_form_bar();
       init_fd_bar(fd_bar)         /* application UI init routine */

       fl_show_form(fd_foo->foo, ...);
       /* rest of the program */
   }
As you see, fdesign generates a structure that groups together all objects on a particular form and the form itself into a structure for easy maintenance and access. The other benefit of doing this is that the application program can create more than one instances of the form if needed.
It is difficult to avoid globals in an event-driven callback scheme with the most difficulties occurring inside the callback function where another object on the same form may need to be accessed. Current setup makes it possible and relatively painless to achieve this.
There are a couple of ways to do this. The easiest and most
robust way is to use the member form->fdui,
which fdesign is set to pointing to the FD_ structure
in which the form is member. To illustrate how this
is done, let's take the above two forms and try to access
a different object from within a callback function.
   fdfoo = create_form_foo();
   ...
and in the callback function of ob on form foo, you can access other objects as follows:
   void callback(FL_OBJECT *ob, long data)
   {
      FD_foo *fdfoo = ob->form->fdui;
      fl_set_object_xxx(fdfoo->f1obj2, ....);
   }
Of course this setup still leaves the problems accessing
objects on other forms unsolved although you can manually
set the form->u_vdata to the other FD_
structure: fd_foo->form->u_vdata = fd_bar or
use the vdata field in the FD_ structure
itself: fd_foo->vdata = fd_bar.
The other method, not as easy as using form->fdui (because
you get no help from fdesign), but just as workable,
is simply use the u_vdata in FD_ structure to
hold the ID of the object that needs to be accessed. In case
of a need to access multiple objects,
there is a field u_vdata in both FL_FORM
and FL_OBJECT structures you can use. You simply use the
field to hold the FD_ structure:
   fdfoo = create_form_foo();
   fdfoo->foo->u_vdata = fdfoo;
   ...
and in the callback function, you can access other objects as follows:
   void callback(FL_OBJECT *ob, long data)
   {
      FD_foo *fdfoo = ob->form->u_vdata;
      fl_set_object_xxx(fdfoo->f1obj2, ....);
   }
Not pretty, but adequate for practical purposes. Note that
the FD structure always has the form as the
first entry and followed by vdata, cdata and ldata.
Also a struct FD_Any is defined in the forms.h:
   typedef struct
   {
       FL_FORM *form;
       void *vdata;
       char *cdata;
       long  ldata;
   } FD_Any;
\end{vernatim}

you can use to cast a specific \verb+FD_+ structure get
to the \var{vdata}.

Another alternative is to use the \verb+FD_+ structure
created as the user data in the callback

\index{object!fl_set_object_callback@{\verb+fl_set_object_callback+}}
\begin{verbatim}
   fl_set_object_callback(obj, callback, (long)fdui);
and use the callback as follows![]()
   void callback(FL_OBJECT *ob, long arg)
   {
       FD_foo *fdfoo = (FD_foo *) arg;

       fl_set_object_lcol(fdfoo->f1obj1, FL_RED);
       ...
    }
Avoiding globals is, in general, a good idea, but as everything else, an excess of a good thing can be bad. Sometimes, simply making the FD_ structure global makes a program clearer and more maintainable.
There still is another difficulty that might arise with
the current setup. For example, in f1obj1's callback
we change the state of some other objects , say,
f1obj2 via fl_set_button/input. Now the state
of f1obj2 is changed and it needs to be handled.
You probably don't want to put too much f1obj2's handling
code in f1obj1's callback. In this situation,
the following function comes in handy
void fl_call_object_callback(FL_OBJECT *obj)
fl_call_object_callback(fdfoo->f1obj2) will invoke
the f1obj2's callback in exactly the same way the
main loop would and as far as f1obj2 is concerned,
it just handles the state change as if the user changed it.
The alternative format outputs something like the following:
   /* callback routines */
   extern void callback(FL_OBJECT *, long);

   extern FL_FORM *foo, *bar;
   extern FL_OBJECT *f1obj1, f1obj2 ...;
   extern FL_OBJECT *f2obj1, f2obj2 ...;

   extern void create_form_foo(void), create_form_bar(void);
   extern void create_the_forms(void);
The C-routines:
   FL_FORM *foo, *bar;
   FL_OBJECT *f1obj1, *f1obj2 ...;
   FL_OBJECT *f2obj1, *f2obj2 ...;

   void create_form_foo(void)
   {
      if(foo)
        return;
      foo = fl_bgn_form(....);
      ...
   }

   void create_form_bar(void)
   {
      if(bar)
        return;
      bar = fl_bgn_form(....);
      ...
   }

   void create_the_forms(void)
   {
       create_form_foo();
       create_form_bar();
   }
Normally the application program would look something like this:
   #include "forms.h"
   #include "foobar.h"

   /* The call back routines */

   main(int argc, char *argv[])
   {
     fl_initialize(....);
     create_the_forms();
     /* rest of the program */
   }
Note that although the C-routine file in both cases is easily readable, editing it is strongly discouraged. If you were to do so, you will have to redo the changes whenever you call fdesign again to modify the layout.
The third file created, ttt.fd, is in a format that can be
read in by the Form Designer. It is easy readable ASCII but you had better not
change it because not much error checking is done when reading it in.
To load such a file select the Open from the File
menu. You will be prompted for a file name using the file
selector. Press your mouse on the file you want to load and press the button
labeled Ready. The current set of forms will be discarded, and
replaced by the new set. You can also merge the forms in a file with the
current set. To this end select Merge from the
File menu.
This chapter discusses the language filter support in Form Designer, targeted primarily to the developers of other language bindings to Forms Library. As of this writing, the authors are aware of the following bindings
gvc@ocsystems.com),martin@nitram.demon.co.uk),zdv017@zam212.zam.kfa-juelich.de) and
Anke Haeming (A.Haeming@kfa-juelich.de), andmichael@tfdec1.fys.kuleuven.ac.be)ralsina@ultra7.unl.edu.ar).
It would appear that author of python binding is no longer
working on it.
These bindings are of varying degree of beta-ness and support. It appears to the authors that the most convenient and flexible way of getting output in the targeted language is through external filters that are invoked transparently by the fdesign. This way, developers of the binding would have complete control over the translation of the default output from the fdesign to the target language and at the same time have the translation done transparently.
An external filter is a stand-alone program that works on the output of Form Designer, and translates the output to the target language. The filter can elect to work on the .fd or the c output or both simultaneously. However, in non-testing situations, the c output from Form Designer probably should be deleted by the filter once the translation is complete.
By default, Form Designer only outputs the .fd and c files. If the presence of -ada, -perl, -python, -fortran or -pascal command line options to Form Designer is detected, then after emitting the default output, Form Designer invokes the the external filter with the root filename (without the .fd extension) as an argument, together with possible other flags, to the filter. Any runtime error messages are presented to the user in a browser. The filter name by default is fd2xxxx where xxxx is the language name (such as fd2python etc.), which can be changed using the -filter command line option (or equivalent resources).
The resources that are relevant to the filter are listed below
| Resource | Type | Default |
| language | string | C |
| filter | string | None |
Form Designer passes along the options that affect the output format to the filter. These options may or may not apply to the filter, most likely not if the filter works on the C file. For those that do not apply, the filter can simply ignore them, but shouldn't stop running because of these options.
A variety of tools are available that can be used to turn your carefully constructed (and hopefully pleasing) user interfaces into printed hardcopies or something appropriate for inclusion in your program document. Most of these involves saving a snapshot of your interface on the screen into a file. Then this file is translated into something that a printer can understand, such as PostScript. While this approach works, the resulting file is typically huge. Further, by taking a snapshot of the screen, the resolution of the output is limited by the screen resolution, which typically is much lower than the printer resolution. This is especially evident for text.
Another approach is to design the printing capabilities into the objects themselves so the GUI is somewhat output device independent in that it can render to different devices and X or the printer is just one of the devices. While this approach works better than screen snapshot, in general, it bloats the library unnecessarily. It is our observation that most of the time when a hardcopy of the interface is desired, it is for use in the application documentation. Thus we believe that there are ways to meet the needs of wanting hardcopies without bloating the library. Of course, some objects, such as xyplot, charts and possibly canvas (if vector graphics), that are dynamic in nature, probably should have some hardcopy output support in the library, even then, the relevant code should only be loaded when these specific support is actually used. This fattening problem is becoming less troublesome as computers are faster and typically with more RAMs on them nowadays.
fd2ps was designed to address the need of having a hardcopy of the interface for application documentation development. Basically, fd2ps is a translator that translates the Form Designer output directly into PostScript or Encapsulated PostScript in full vector graphics. The result is a small, may even be editable, PostScript file that you can print on a printer or include into other documents.
The translation can be done in two ways. One way is to simply give the Form Designer the command line option -ps to have it output POSTSCRIPT directly or you can run the fd2ps stand alone fd2ps fdfile where fdfile is the Form Designer output with or without the .fd extension. The output is written into a file named fdfile.ps.
The fd2ps accepts the following command line options when run stand alone
| Letter | 8.5 x 11 inch. |
| Legal | 8.5 x 11 inch. |
| A4 | 210 x 295 mm. |
| B4 | 257 x 364 mm. |
| B5 | 18 x 20 cm. |
| B | 11 x 17 inch. |
| Notes | 4 x 5 inch. |
The fd2ps program understands the environment variable PAPER, which should be one of the above paper names.